
Using Adobe Edge Tools and Services with Kendo UI
Several months ago Adobe announced a number of products under the name of Edge Tools and Services. Some of these included new names on existing projects you may already have heard of like Shadow which became Edge Inspect and Brackets which saw a branded release under the name of Edge Code. Others were already quite well known and widely used such as Edge Animate (formerly just Edge), Typekit and PhoneGap Build. Still others were brand new including Edge Web Fonts which is already freely available and Edge Reflow which was previewed but has not yet been released publicly.
One thing that all these tools have in common is that they are all lightweight and focused on a particular task. This means you don’t need to buy into a full stack solution or monolithic IDE, but can pick and choose the tools that fit best into your particular workflow. In this article, we’ll take a look at one such potential workflow. We’ll assume I am building a Kendo Mobile app using Brackets (or Edge Code) for our HTML, CSS and JavaScript coding, then Edge Inspect for some multi-device testing, and finally PhoneGap Build creating device-specific apps.
Coding with Brackets (Edge Code)
Brackets is a lightweight code editor for HTML, CSS and JavaScript. There are a lot of lightweight code editors on the market, but Brackets has some features that make it unique.
Brackets is entirely open source, licensed under the MIT license, and available on Github. It is built upon web technologies which not only means that if code HTML, CSS and JavaScript, you can contribute to Brackets but also means you can edit Brackets with Brackets. More importantly, it is highly extensible using these same technologies, meaning you can customize your code editor using the web technologies you know and love (if you want to learn how, this article will teach you). There are even a good number of extensions already available, built both by the community and Adobe.
Let me briefly explain the difference between Brackets and Edge Code. Edge Code is a branded release of the Brackets open source project that is available with a free Creative Cloud subscription. It, therefore, includes all the same features but also comes with some pre-loaded extensions that integrate with Adobe tools and services. Future Edge Code releases will continue to expand upon this integration.
If we’re building a Kendo mobile application, we can leverage some additional features in Brackets. One of the things about developing apps with HTML, CSS and JavaScript for the browser is that you constantly end up switching from your HTML file to one or several of your CSS files then to one or several JavaScript files and finally to the browser and refresh. All of this, just to make even a simple change to your page. Brackets helps ease that process a bit with two features, one called Quick Edit and the other Live Development.
Quick Edit is a feature that allows you to get access to and edit relevant CSS classes and JavaScript functions without ever having to leave your HTML file. As you can see in the screenshot below, if I place my cursor on the header block in my Kendo Mobile document, then hit ctrl/cmd+E, Brackets will open a Quick Edit view that displays to me any classes across my project’s CSS files that could apply to this element, including custom CSS classes as well as built-in Kendo Mobile styles, and I can simply edit them inline. Similarly, if I had a JavaScript function call, use Quick Edit to view the relevant function in my JS files.

Live Development is a feature that also saves you from repetitive tasks and improves the development workflow. With the Live Development feature turned on, any edits that I make in my CSS will immediately be visible within my Chrome browser window, without refreshes or even saving the file I am editing. This allows you to see the effect of style changes you are making live, as you code them. Changes to HTML will become visible within my Chrome browser as soon as they are saved, also without requiring a brower refresh.
Testing with Edge Inspect
Now that we have our Kendo Mobile app working in our desktop browser the way we want, it is time to do some real testing on devices. Typically, my process might be a painful one of ensuring the page is at a URL accessible by my devices, loading the page on each device, testing, fixing issues, unlocking each device, refreshing each browser and retesting. This tedious and cumbersome process might repeat itself countless times until I finally have everything looking and functioning just how I want it. What if instead I could test on all the devices at the same time without needing to worry about unlocking, entering the URL or refreshing?
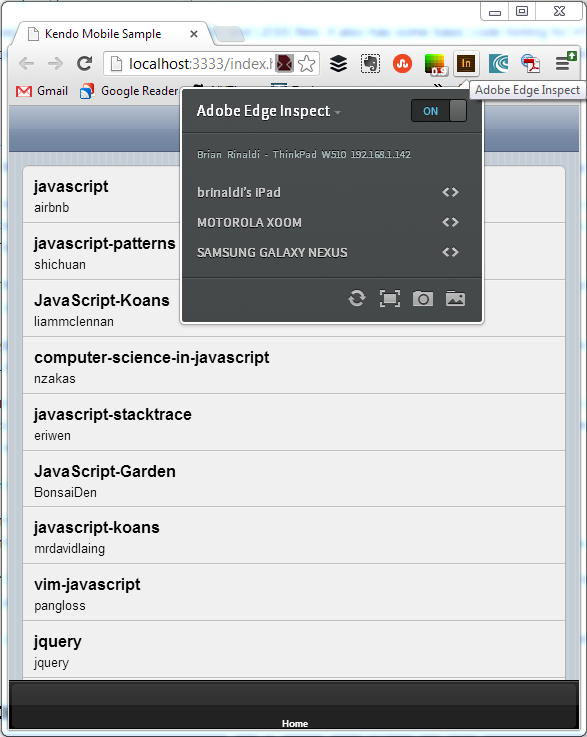
Adobe Edge Inspect, formerly known as Adobe Shadow, allows just that. Edge Inspect has three pieces: a desktop application which must be running for the system to work; a Chrome extension and an app currently available for iOS and Android. With all three pieces running, all of my connected devices will follow along as I browse within Chrome, even switching URL’s as I change tabs and also able to access my localhost without any special setup. For example, in the screenshot below, you can see that I have an iPad, Motorola Xoom and Galaxy Nexus all connected to Edge Inspect.
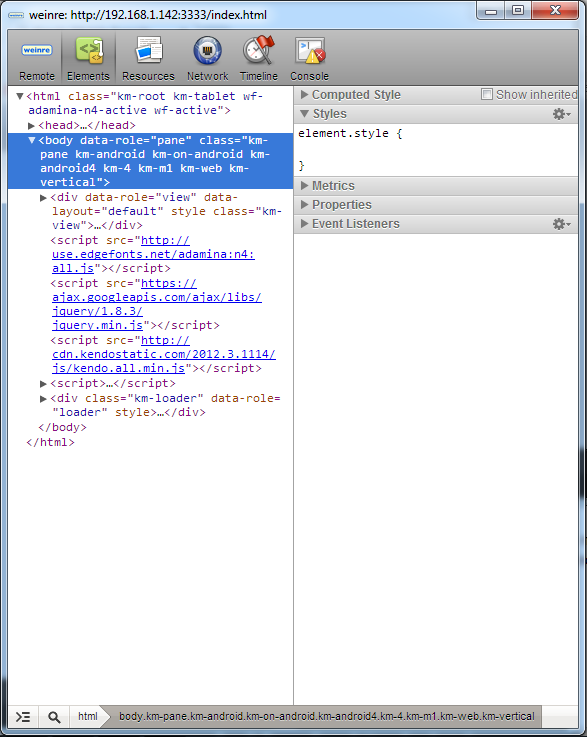
However, I can go beyond simply browsing the page. Edge Inspect uses weinre to allow me to actually debug the page, accessing and modifying the HTML and CSS on each device and viewing the console as I might via the Chrome Developer Tools.
In addition, I can request screenshots of each connected device along with some metadata about each screenshot. As you can imagine, this be a valuable tool for any QA team.
Edge Inspect, like Edge Code, is also available with the free Creative Cloud subscription, though some of the features including connecting multiple devices at once and requesting screenshots due require a paid subscription.
Building with PhoneGap Build
Obviously, if you want to build a browser-based Kendo Mobile application, we’re good to go at this point. But what if we wanted to access features on the device that cannot reliably be accessed via mobile browsers yet, or if we wanted to monetize our application via the various app marketplaces?
PhoneGap is a solution that has been around for some time to solve that problem, providing a bridge between my app built with web technologies and the various device API’s that cannot yet be accessed via HTML and JavaScript, as well as offering a way to package these applications for release on the app stores. While PhoneGap let me target a number of device platforms with, for the most part, a single codebase, setting up my environment to build for all these platforms wasn’t always the most accessible process. PhoneGap Build, however, makes turning your HTML, CSS and JavaScript applications into native mobile applications incredibly easy.
PhoneGap Build is a cloud service that will create the builds for various platforms for you. There is no complex environment to set up on your machine; you can use any coding environment that is comfortable for you to create the HTML and simply upload it to the PhoneGap Build service, or connect it to your GitHub repository or even use the integration available for Brackets and Edge Code or Dreamweaver. Plus, you can still take advantage of all the device API’s PhoneGap supports by default as well as a curated set of plugins. There’s even an API you can tie into if you want to integrate build into your own build process.
Of course, you should always keep in mind why you are creating an app versus running in the browser, ensuring you are providing some benefit or feature that enhances the user’s experience. But getting started building Kendo Mobile based apps is easy and, in fact, Kendo’s very own Burke Holland has an excellent tutorial on how to do just that.
Where to Go From Here
While I have focused on an entire workflow based around a number of Edge Tools and Services (and even skipped over a few), my point wasn’t to sell you on a comprehensive solution where you need to completely remake your own workflow. If you want to, by all means, all of the tools should work well within your environment (and with the Kendo frameworks). But the key takeaway here should be that each of these tools fills a very specific need and can integrate into and hopefully improve your existing workflow.

Brian Rinaldi
Brian Rinaldi is a Developer Advocate at Progress focused on the Kinvey mobile backend as a service. You can follow Brian via @remotesynth on Twitter.
Comments
All articles
Topics
Latest Stories
in Your Inbox
Subscribe to be the first to get our expert-written articles and tutorials for developers!
All fields are required